Build a Cozy LED Miniature Bakery Diorama Kit
DIY Miniature Dollhouse Bakery Kit with LED – Food Box Shop Diorama Set
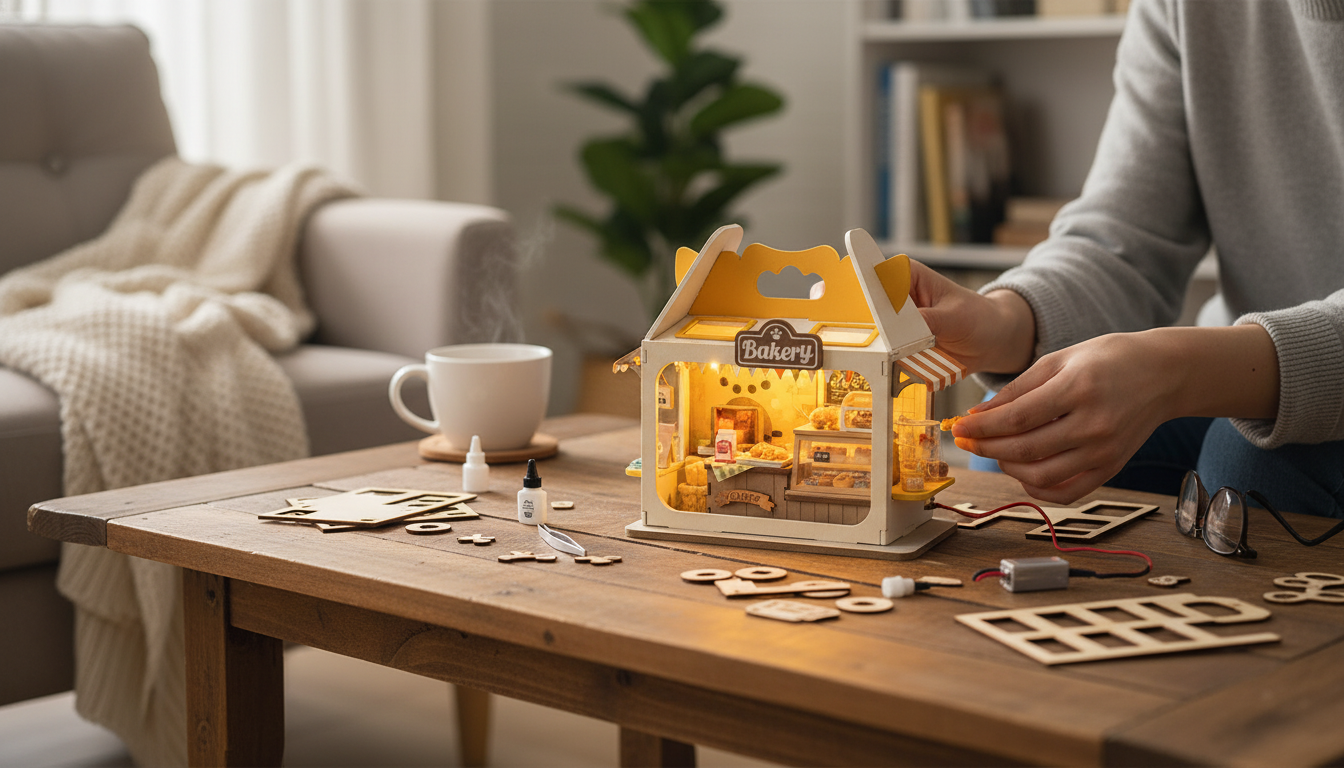
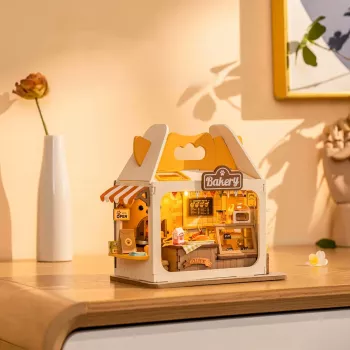
A tiny bakery scene feels especially alive when the display lights glow, the counter looks stocked, and every paper bag or pastry tray has its place. The DIY Miniature Dollhouse Bakery Kit with LED – Food Box Shop Diorama Set is designed for a satisfying build and a cozy finished diorama—great for hands-on crafting, shelf décor, or gifting to anyone who loves miniatures. If you enjoy the “tiny world” tradition of dollhouse scenes and room boxes, the finished piece delivers that warm, lived-in shop vibe in a compact footprint (for a quick overview of miniatures as a hobby, see this dollhouse overview).
What this miniature bakery diorama set includes
This kit centers on a bakery shop theme, built as a room-box style display that looks like a small storefront interior. The charm comes from the layered look—walls, floor, counter areas, and miniature décor—so the scene reads as a real place rather than a flat craft.
- Mini bakery shop theme with food display elements and a compact storefront-style layout
- LED lighting component to create a warm “open for business” look when displayed
- Small-scale accessories (e.g., counter/display details, shop décor pieces) that build the bakery atmosphere
- Parts intended for assembly into a finished room-box style scene suitable for desktop or shelf display
- A build that rewards careful folding, gluing, and alignment for clean edges and realistic depth
Because small parts do a lot of visual work at this scale, the most convincing results come from taking your time: crisp folds, tidy glue lines, and straight placement will make the bakery feel “architectural” instead of crafty.
Finished look: lighting, depth, and display ideas
The LED is the detail that turns the scene from cute to captivating. When positioned to wash the counter and display area, it highlights the miniature textures and makes the interior feel occupied—like you could step inside and order something sweet.
- LED placement can emphasize the food box/display area and make the interior details stand out
- Layering (front counter, mid-shelf, back wall) helps the small scene feel more “walk-in” than flat
- Display ideas: bookshelf nook, craft room accent, bedside shelf glow, or part of a larger miniature street
- Photography tips: reduce overhead glare, shoot at counter height, and use the LED as the key light
- Optional styling: add a simple name sign, tiny menu board, or seasonal color accents to personalize the shop
Quick display checklist
| Detail to check | Why it matters | Simple fix |
|---|---|---|
| LED light direction | Prevents harsh shadows on the counter | Angle light toward the display area |
| Wall and floor alignment | Keeps the room box square and tidy | Dry-fit before gluing |
| Small items secured | Stops pieces shifting over time | Use tiny dots of craft glue |
| Visible glue spots | Affects realism in close-up view | Apply with a toothpick, wipe excess |
| Battery access (if applicable) | Makes future use easier | Avoid sealing the access area |
Skill level, time, and who it’s for
This is a relaxing, detail-focused project that suits patient builders who enjoy small, precise steps. It’s a nice “slow craft” build: you’ll see progress early as the structure comes together, then the scene gets progressively richer as you add tiny shop elements.
- A relaxing, detail-focused project suited to patient builders who enjoy precise placement
- Good fit for teens and adults; younger crafters may need help with small parts and adhesives
- Time expectations vary by experience: careful assembly plus drying time for adhesives
- Great gift categories: miniature hobbyists, dollhouse collectors, crafty friends, cozy décor lovers
- A satisfying option for mindful crafting—small repetitive steps with a visible “scene coming together” payoff
If you’re newer to miniatures, the most helpful mindset is “steady over speedy.” A clean build is less about advanced technique and more about organization, neat glue application, and letting sections set fully before moving on.
Tools and setup for a smoother build
A few basic tools make miniature kits significantly easier—especially when you’re aligning corners, holding tiny pieces, or keeping glue exactly where it belongs.
If your kit uses batteries, it’s worth following general household guidance on handling and storage—especially for long-term display pieces (see CPSC battery safety guidance).
Assembly flow that keeps details crisp
Care, storage, and long-term enjoyment
More in-stock picks
- DIY Miniature Dollhouse Bakery Kit with LED – Food Box Shop Diorama Set ($28.82)
- AI Tips to Elevate Your Writing Voice | Editable Writing Tone Checklist | Digital Download for Writers & Creators | ai tips for improving writing tone | Tone & Style Guide ($4.99)
- AI Newsletter Wizard – Ultimate Editable Checklist for Email Creators | AI Prompts for Newsletter Content | Digital Download for Content Strategy & Email Marketing ($3.99)
FAQ
Does the LED light come pre-installed or does it need to be assembled?
The LED lighting is typically part of the build process, so you’ll usually place it during assembly and route any wiring neatly so panels stay flush. Before sealing anything permanently, confirm the light works and keep access to the power/battery area (if included).
What glue works best for miniature bakery diorama kits?
A clear-drying craft glue works well for most paper- and wood-like miniature parts when applied in tiny amounts. Use a toothpick to place micro-dots of glue and avoid over-applying, which can cause warping or visible shine.
Is this kit suitable for beginners?
It can be beginner-friendly with patience, especially if you organize pieces, dry-fit often, and work in small sessions. Because parts are small and alignment matters, tweezers and careful glue control make the experience much smoother.


Leave a comment